Follow these instructions to setup essential information on your machine.
User information.
Your name and your email address must be joined to your commits. These commands set values to use (change "First Last" by your first and last names and change first.last@domaine.tld by your e-mail address):
git config --global user.name "First Last"
git config --global user.email first.last@domaine.tld
Interface preferences.
The following alias provides a nice graph of your tree, showing the branch structure:
git config --global alias.lola "log --graph --decorate --pretty=format:'%ad %C(auto)%d %h %s %C(cyan) [%an]' --abbrev-commit --all --date=human"
Set your preferred text editor to edit commit messages:
git config --global core.editor emacs
Enable colored messages in your terminal, which is more convenient to read:
git config --global color.diff auto
git config --global color.status auto
git config --global color.branch auto
Caution: Git uses the less pager which may not display colors correctly (as in condor). If you encounter this issue, type the following command:
git config --global core.pager "less -R"
Bash detection of the current branch.
To automatically detect the name of the current branch, please add to your ~/.bashrc file the following lines
parse_git_branch() {
git branch 2> /dev/null | sed -e '/^[^*]/d' -e 's/* \(.*\)/(\1)/'
}
export PS1="\[\e[96m\]\u\[\e[33m\]@\[\e[96m\]\h \[\e[93m\]\$PWD \[\e[31m\]\$(parse_git_branch)\[\e[00m\]$ "
Search in the code
A quick search method of a string pattern within the code can be made with git grep command. The following gg function to be added in your ~/.bashrc file could be :
function gg {
  git grep -n "$1" $2
}
The following ggsb function will find the path of the file where a subroutine $1 is defined :
function ggsb {
  git grep -n --color=always -E "$1.*subroutine|subroutine.*$1" $2
}
New Git users are invited to read some guides to get familiar with vanilla Git concepts and commands. Some guides available online:
Nevertheless, some good practice must be recalled here:
git show of your commit, but we cannot do a git show of your brain. [Cooking] Add the new "raclette" recipe. This recipe follows the structure of the existing reciepe... using the global variable `savoie` added with this commit. It uses the cheese provided by the module mod_foo, that does already the job. This recipe may be activated by setting the boolean `chalet` to true in the input file.
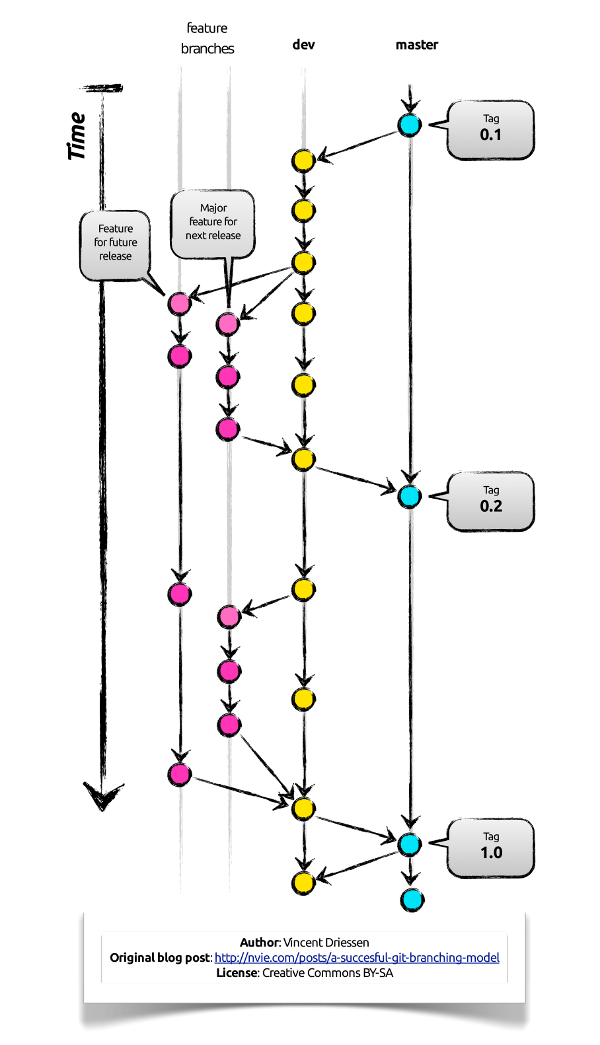
The Notus repository is based on a simplified version of the [git-branching-model][Git branching model] of Vincent Driessen.
That is, Notus repository have two main branches:
master nor the dev branches.Instead, developers should create their own feature branches, push them into their public repository, and, once ready, ask the Notus maintainer to merge their modification into the dev branch. Figure 1 below illustrates the branching organization.

Notus sources are accessible in the [official] repository (read-only access). Notus developers have a public repository [user/public], in which they publish their feature branches. Developers are encouraged to work in a different repository [user/private], to keep their public repository clean, and to work directly on their targeted machines.
    [official]      [user1/public]     [user2/public]   ...

                    [user1/private]    [user2/private]  ...
The development is thus organized as follows:
 [official]      [user/public]
     │
     └─────────> [user/private]
 [official]      [user/public] <─┐
                                 │
                 [user/private] ─┘
 [official] <─── [user/public]

                 [user/private]
The developer can update its repositories:
 [official]      [user/public]
     │
     └─────────> [user/private]
Which is similar to step 1, and working on the next modifications.
Notus uses a self-hosted GitLab website: https://git.notus-cfd.org/notus/notus.
Here is a list of common manipulations that are specific to the Notus organization, and are intended to help any inexperienced user.
git checkout master
git pull official master
git checkout dev
git pull official dev
git push
Create a new branch from the dev branch:
git checkout dev
git branch new_branch
git checkout new_branch
where new_branch is a name of your choice.
Make developments, do commits.
Get the status of your modifications:
git status
Add a file or a file modification to prepare next commit:
git add file_name
Commit your modifications (write a clear commit message):
git commit
Fix up the last commit:
git commit --amend
Some shortcuts to use with caution:
Add ALL file modifications to prepare next commit:
git add -u
Add AND commit at the same time:
git commit -a
Push your finished work into your public repository
git push
Please, mind that you should not modify your commits once you pushed them.
Synchronize your repository with the official repository
Fetch all the modifications of distant repositories
git remote update -p
Update your local and public dev branch
git checkout dev
git pull official dev
git push origin
Rebase your local branch to dev
git checkout local_branch
git rebase dev
Miscellaneous Git commands
Cancel a file modification
git checkout filename
Cancel last commit
git reset --hard HEAD^
 git diff --name-status
 git diff --name-only
 git branch -d toto
 git push --delete origin toto
git switch -c toto_sub toto
 git checkout master
 git merge --squash bugfix
 git commit
git switch -c dev_local origin/dev
git rebase -i xxx1azy
From this command, your favorite editor will open. From here, we can choose between reword, fixup, squash, etc. After your choices made, you need to save & quit your editor. Editor windows will then open again for starting the (re-)edition of your history.